总结摘要
DriverLib 是新一代 MCU 访问外设的优选模式。老一代 MCU 仅支持 Bitfield。本文将介绍使用 Bitfield 为 DSP28377D 芯片建立 EABI 项目的具体流程。首先建立项目文件。其次,配置头文件和库文件的链接路径。再次,修改项目配置将代码分别烧录到 FLASH 和 RAM。最后,给出一个标准的main函数示例。
前言
从新版本(Code Composer Studio Theia 20.0.0)开始,官方不再建议新建项目,而是从空示例项目文件新建导入。新版本新建项目时,也是从空示例项目中进行选择。当选择 Bitfield 进行开发时,空示例项目所在的路径如下(需要根据 C2000Ware 安装路径进行修改):
1
| E:\CodeComposerStudio\C2000Ware\C2000Ware_5_04_00_00\device_support\f2837xd\examples\cpu1\empty_project
|
重要
仅支持 Bitfield 的大部分老一代 MCU 在 C2000Ware 中 也是没有空示例项目的,还是需要自己新建项目,或者在其它示例项目上进行修改。
新版本创建项目的流程就是导入示例项目,然后根据需求进行自定义修改。下面是导入示例项目的步骤:

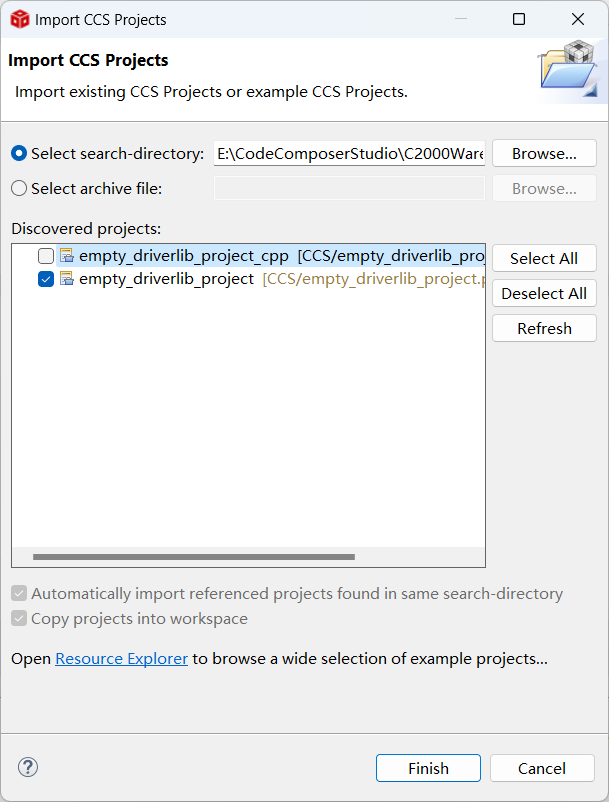
导入项目后,如果项目文件夹不在工作区文件夹中,CCS会自动将导入的项目拷贝到工作区文件夹中。
建立 EABI 项目
使用 driverlib 进行项目开发时,可以使用
Sysconfig
等便捷开发工具。推荐采用
driverlib
进行产品开发。对于不支持 driverlib 的老一代 MCU ,这里记录一下建立新项目的具体流程,以备后续参考。
新建项目文件
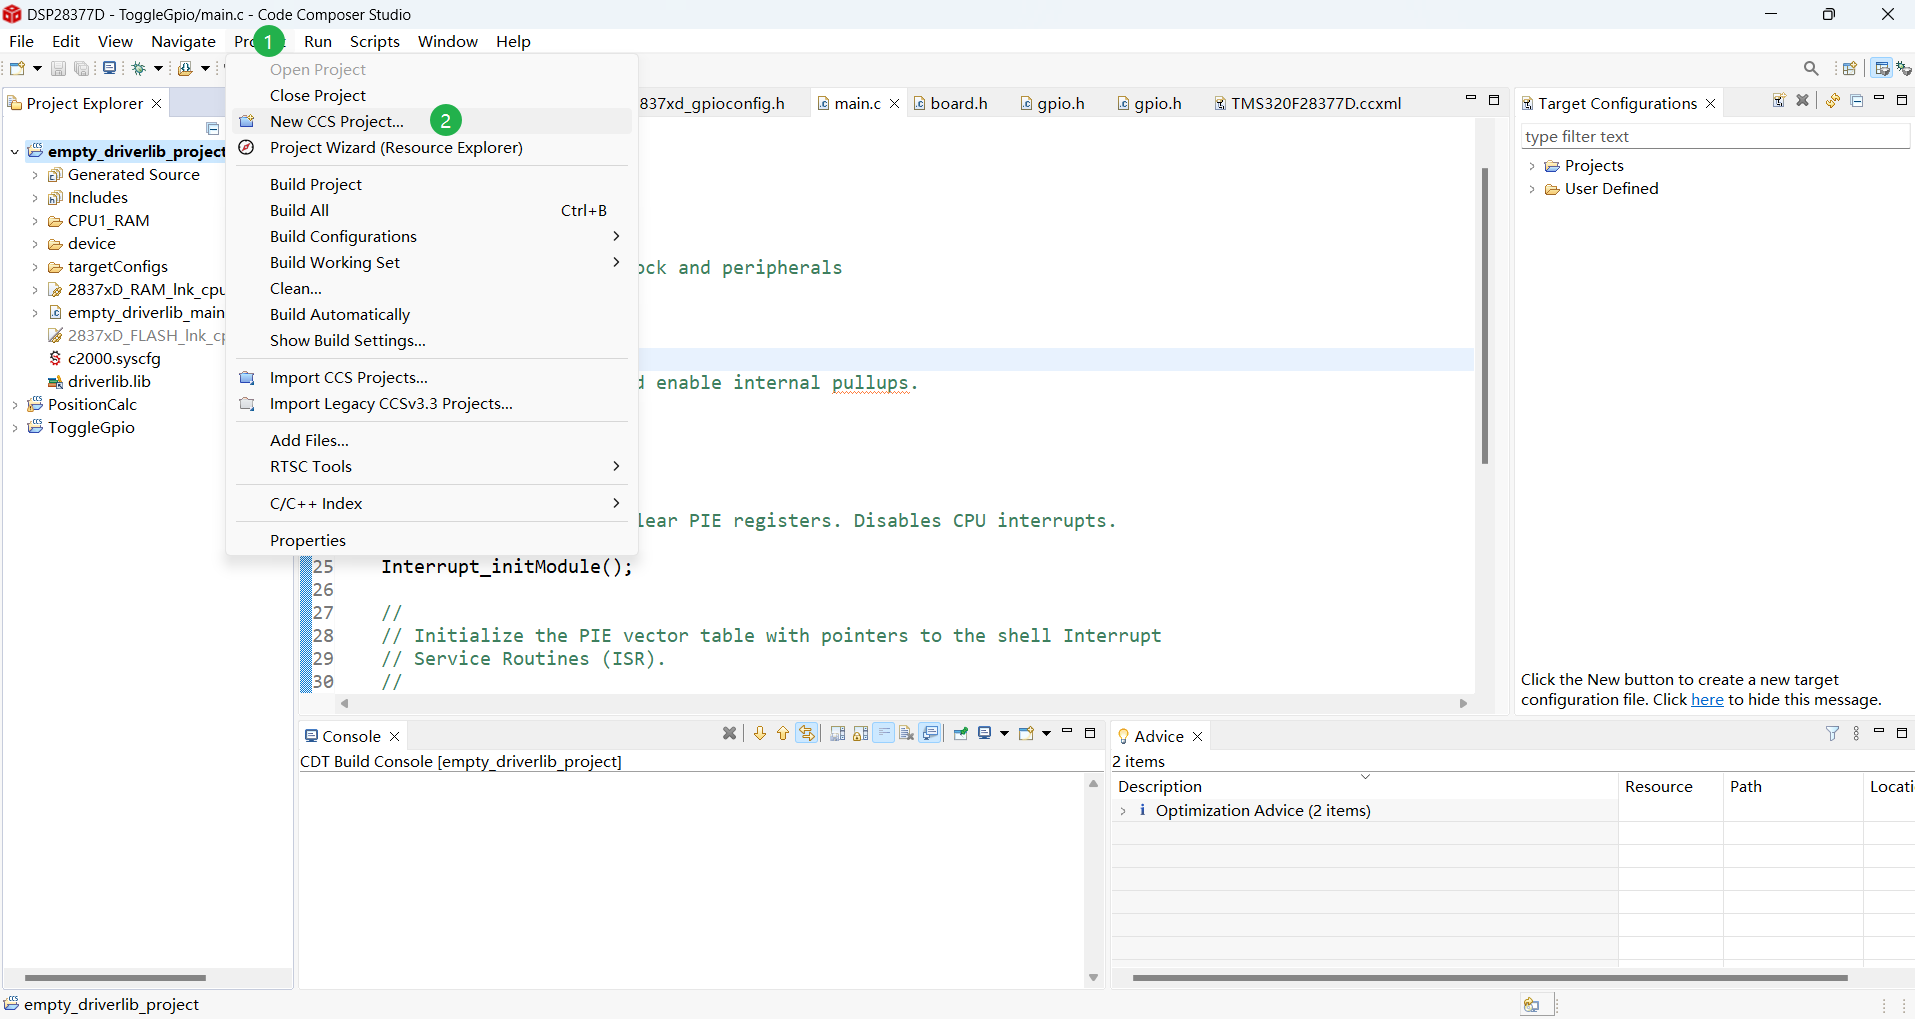
首先,点击菜单栏的 Project 菜单,选择 New CCs Project 功能,操作步骤和弹出的新出项目对话框如下图所示。
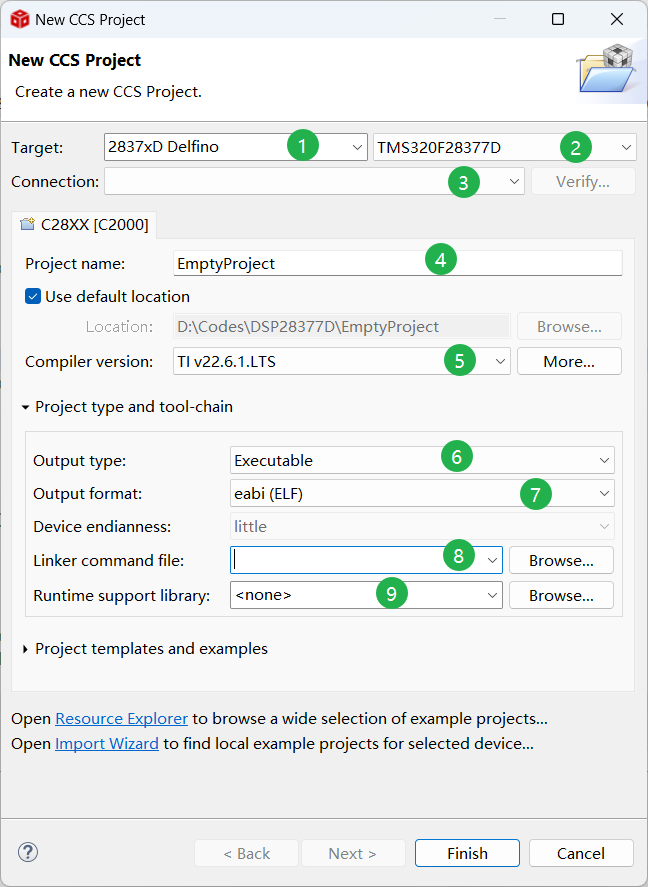
- 芯片选择:新建项目时首先选择芯片系列,然后选择具体的芯片。也可以直接选择具体的芯片,但是选项太多了。
- 调试器选择:在新建项目时,可以先不选择具体的调试设备,之后通过新建 Target Configuration File 进行设置。
- 设置项目名称:项目名称的要求与C语言变量名要求一致,但是可以以数字开头,如果项目名非法时,对话框上方会进行提示。建议将项目名称设置和具体项目要求一致。
- 选择编译器:编译器直接选择最新版本即可。
- 项目类型和工具链配置:因为是要烧录到芯片中的项目,所以输出类型选择可执行文件(Executable),输出文件格式选择eabi(ELF),EABI 为为最新的文件格式,为 ti 推荐的文件格式。链接文件和运行库文件之后配置。
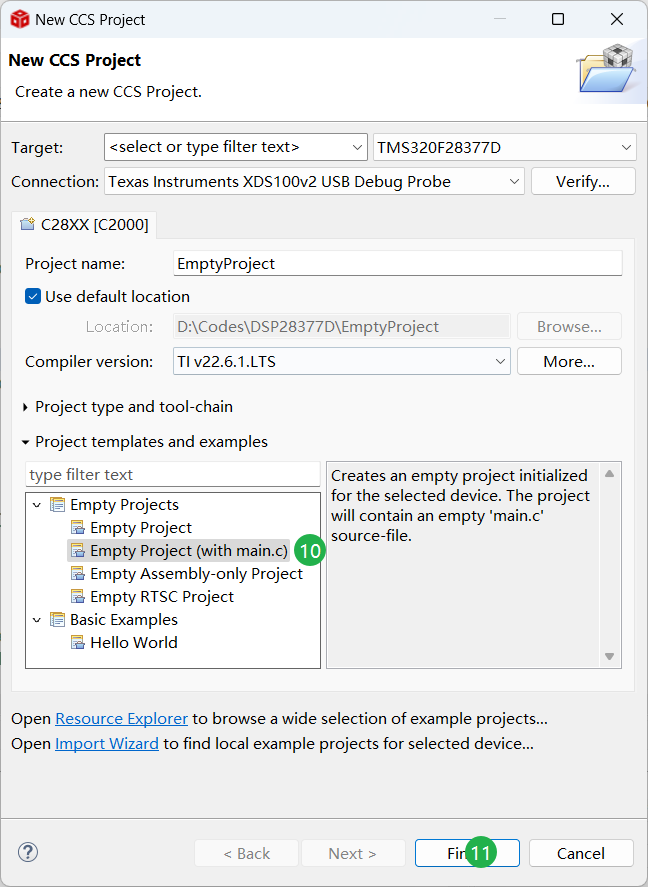
- 选择项目模板:直接选择空项目模板带有 main.c 文件。
- 建立项目:配置完成后,点击 Finish 建立项目。
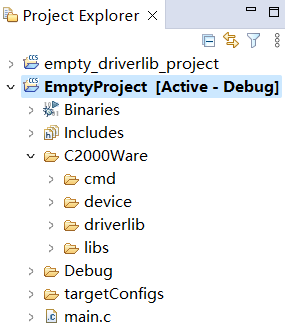
新建项目完成后,新建的项目将显示在项目浏览器(Project Explorer)中,如果 Project Explorer 未打开,可以点击菜单栏中的 View 菜单,选择 Project Explorer。
拷贝头文件和库文件
为了顺利编译项目,需要配置 driverlib 相关的头文件和库文件。
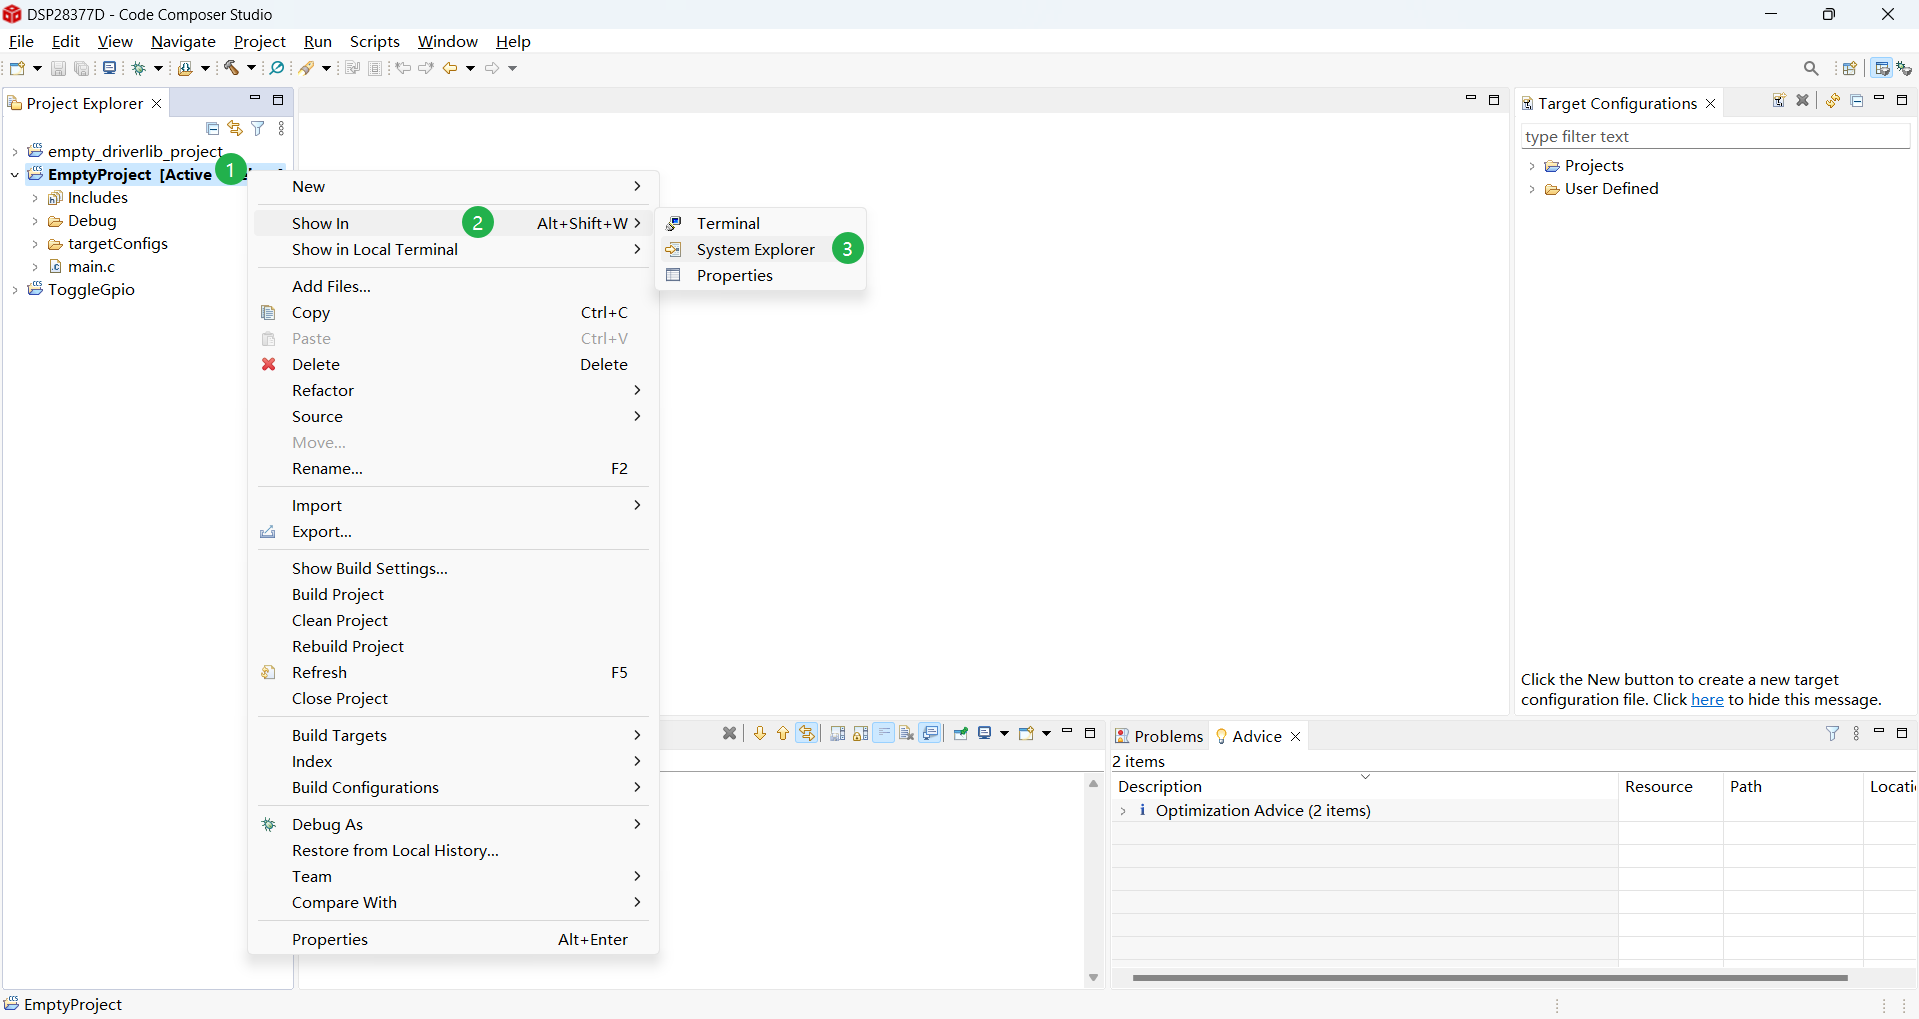
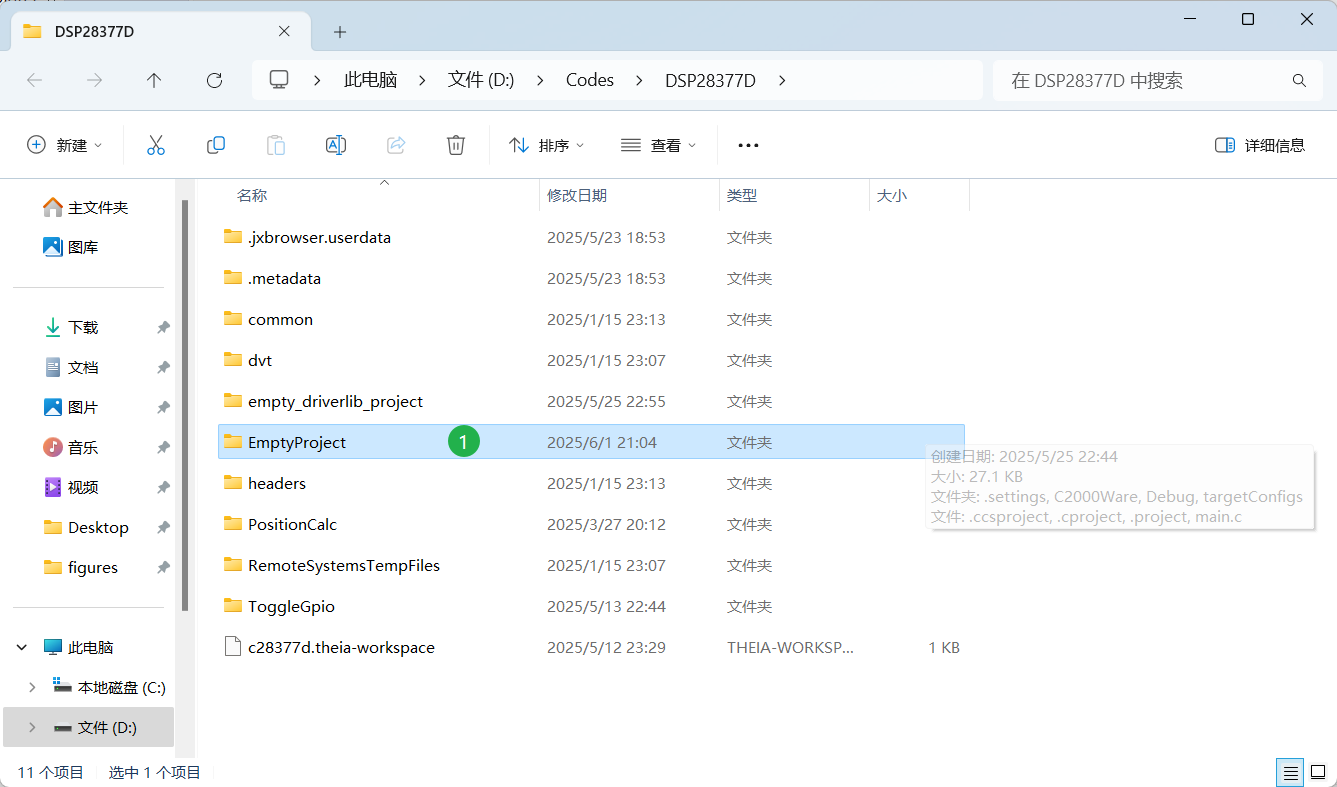
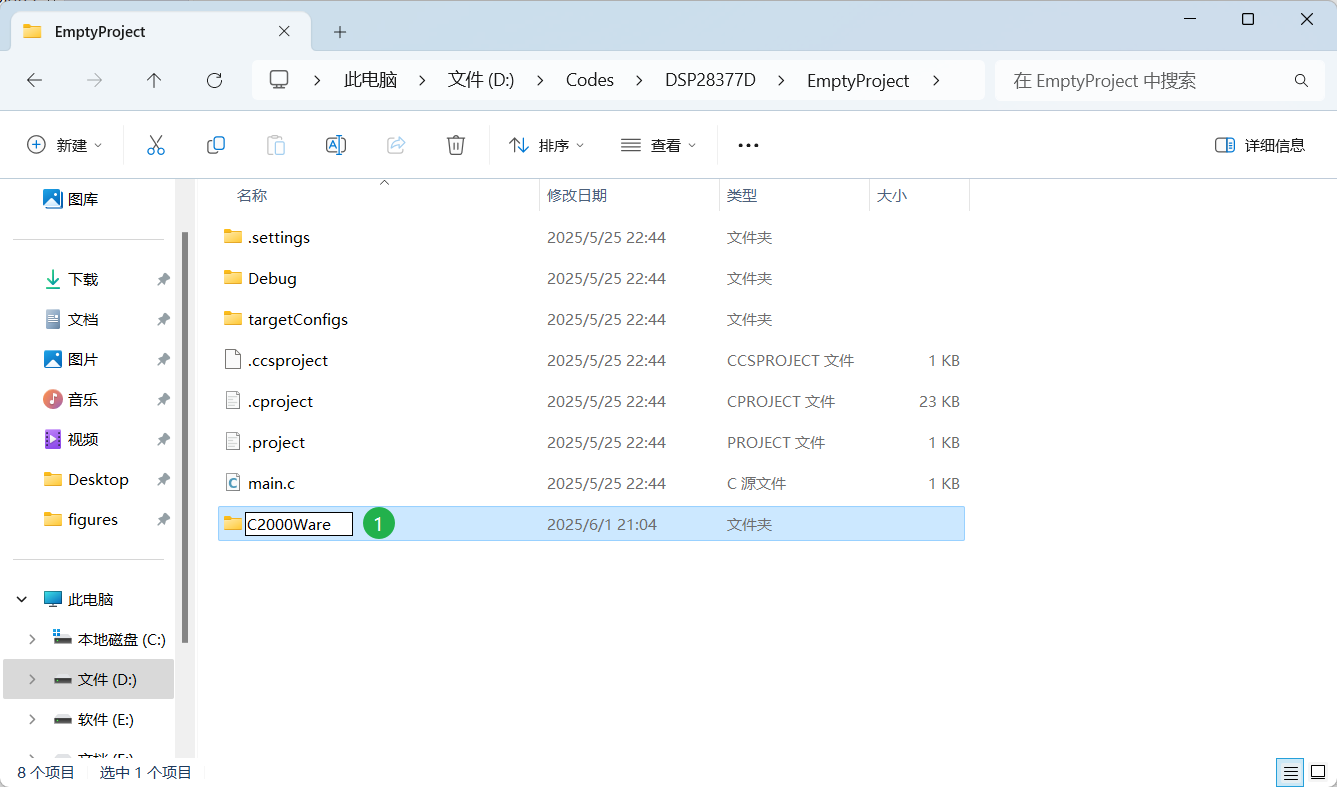
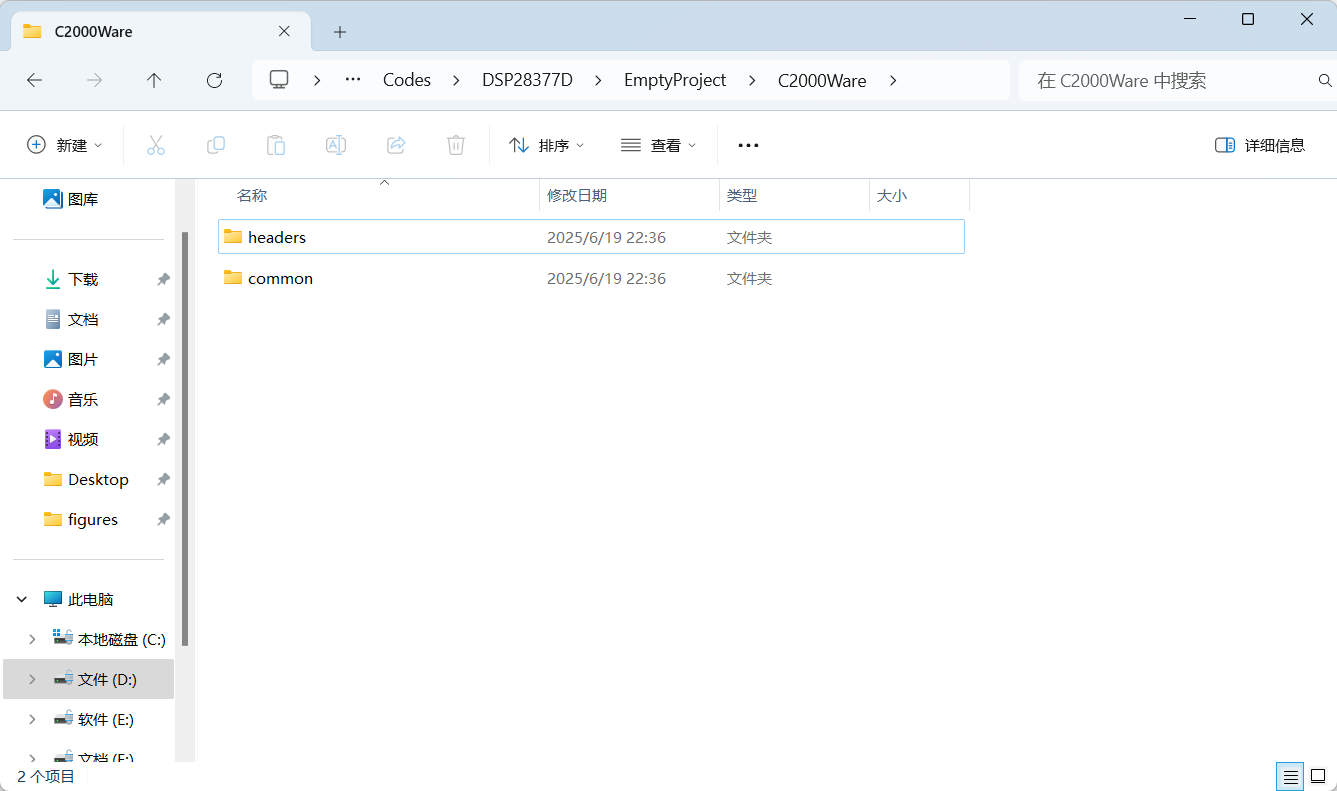
在 Project Explorer 窗口中选中当前创建的项目,然后点击鼠标右键,依次选择 Show In -> System Explorer,在打开的文件夹中双击项目名称对应的文件夹,进入项目文件夹并新建 C2000Ware 文件夹。
进入C2000Ware文件夹,将 f2837xd 的 common 和 headers 文件夹中的所有文件拷贝到到 C2000Ware 文件夹内(根据具体芯片和 C2000Ware 包安装路径进行修改)。
1
2
| E:\CodeComposerStudio\C2000Ware\C2000Ware_5_04_00_00\device_support\f2837xd\common
E:\CodeComposerStudio\C2000Ware\C2000Ware_5_04_00_00\device_support\f2837xd\headers
|
common 和 headers 文件夹中包含 driverlib 开发的部分源文件和头文件,只采用 BitField 开发时需要删除下面的文件。
1
2
| ...\EmptyProject\C2000Ware\common\source\device.c
...\EmptyProject\C2000Ware\headers\include\F2837xD_device.h
|
拷贝库文件
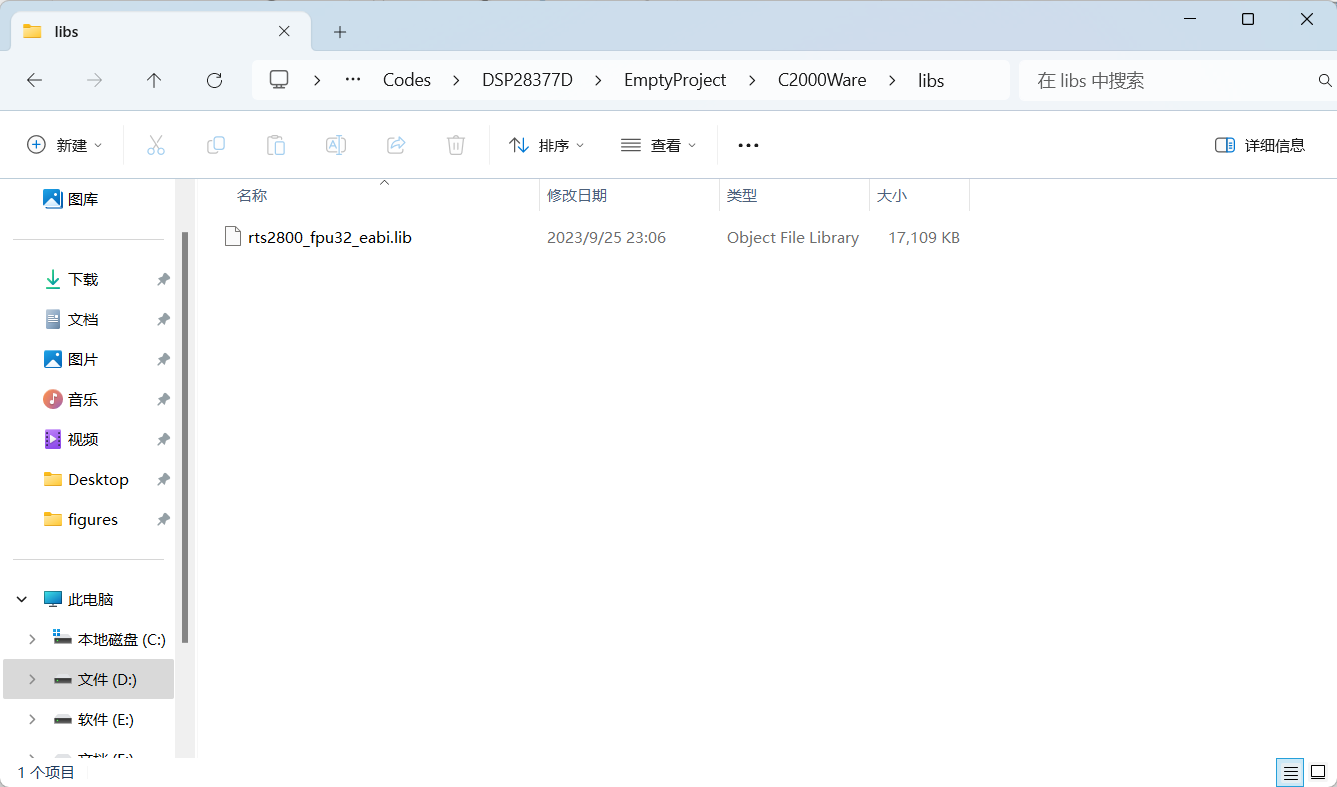
在 C2000Ware 文件夹中新建 libs 文件夹,将 C2000 芯片的 lib 文件拷贝到 libs 文件夹中。lib 文件只有编译器的版本有关,在新建项目时选择的编译器版本为 TI v22.6.1.LTS。 TI v22.6.1.LTS 编译器的 lib 文件的安装路径如下(具体参考 ccs 的路径有关):
1
| E:\CodeComposerStudio\CCS12.7\ccs\tools\compiler\ti-cgt-c2000_22.6.1.LTS\lib\rts2800_fpu32_eabi.lib
|
禁用不使用的 CMD 文件
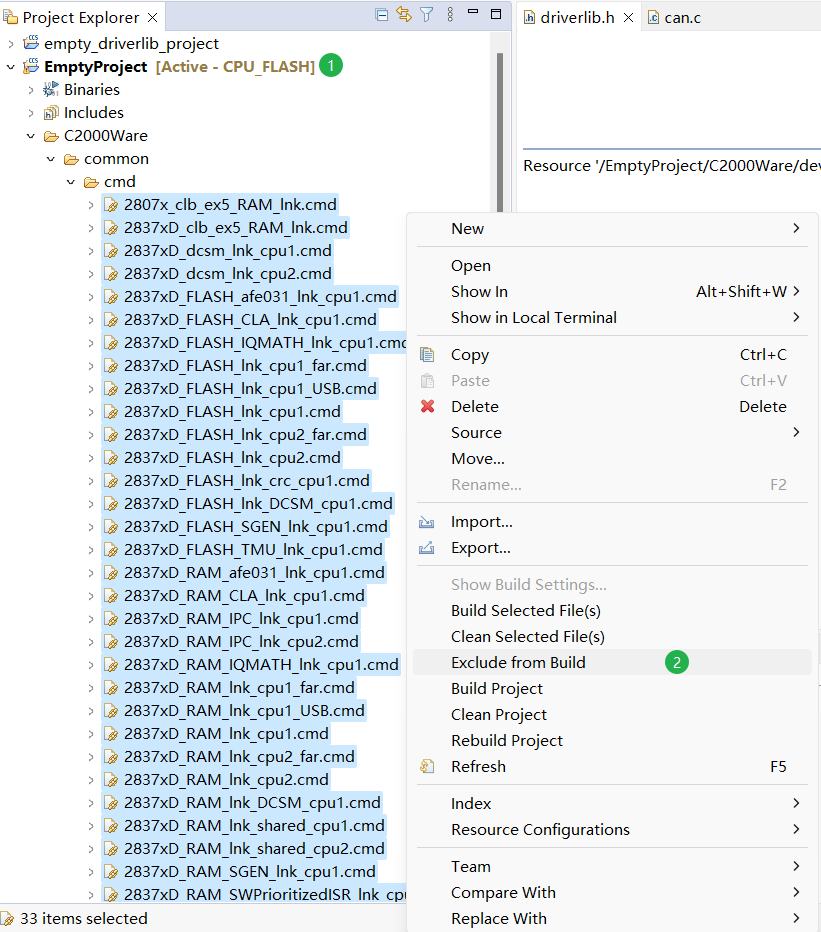
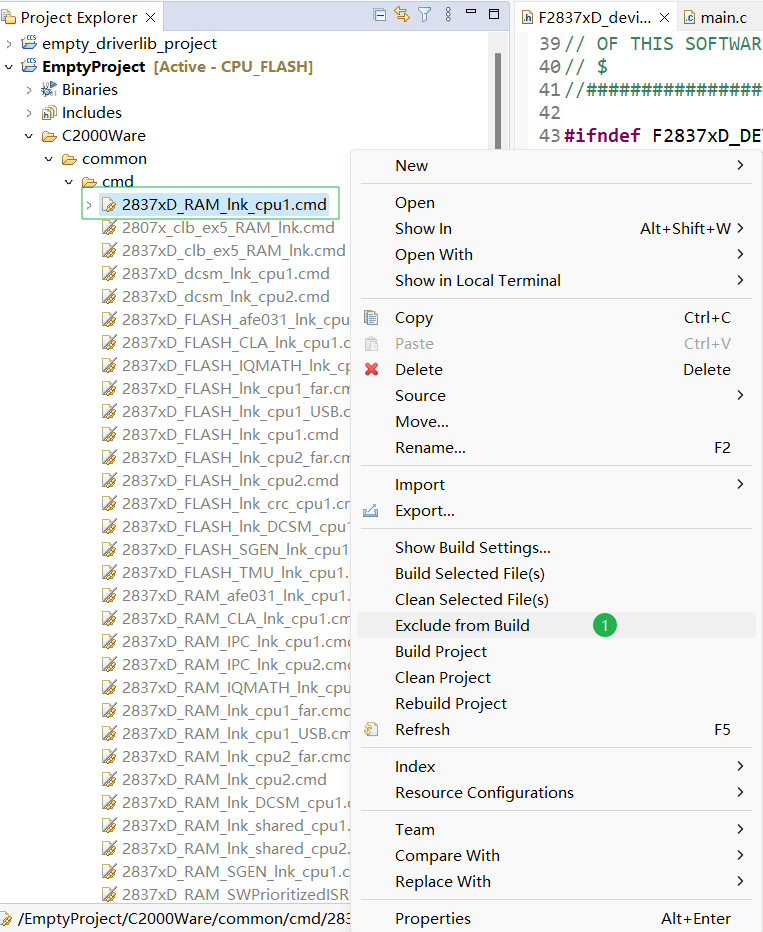
回到 CCS 软件中,在 Project Explorer 中选择新建的项目文件依次打开 C2000Ware -> common -> cmd,选中所有的链接文件(.cmd 文件)后,点击鼠标右键选中 Exclude from Build 选项。
注意
这里的 cmd 文件用于定义程序的内存布局,包括代码段、数据段等在不同内存区域的分布。
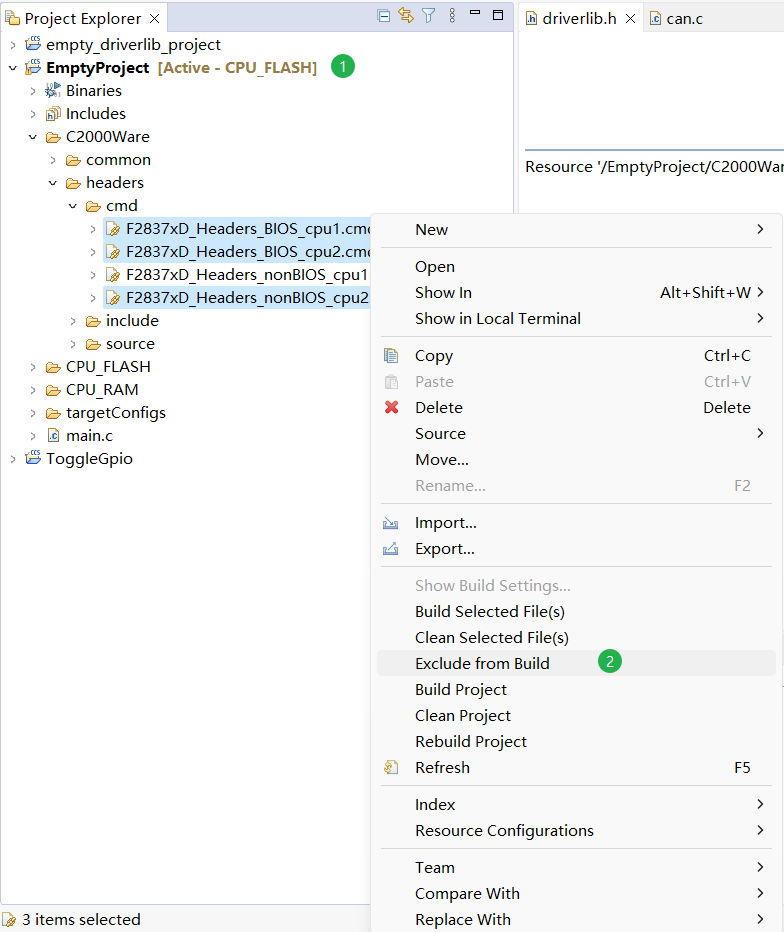
在 Project Explorer 中选择新建的项目文件依次打开 C2000Ware -> headers -> cmd,选中除了 F2837xD_Headers_nonBIOS_cpu1.cmd 外的所有的链接文件(.cmd 文件)后,点击鼠标右键选中 Exclude from Build 选项。
注意
这里的 cmd 文件用于配置 MCU 中各个外设在内存中的布局,正常情况下是不需要进行修改的。
这里要根据项目需求选择启用的 CMD 文件,当烧录到 CPU2 时,要启用 F2837xD_Headers_nonBIOS_cpu2.cmd,并禁用其它 cmd 文件;如果采用操作系统,就启用 F2837xD_Headers_BIOS_cpu1.cmd 或 F2837xD_Headers_BIOS_cpu2.cmd,并禁用其它的 cmd 文件。
禁用不使用的源文件和头文件
下面的头文件和源文件用于设置软件中断优先级,如果没有特殊需求一般不会使用。勾选 Exclude from Build 将下面的文件从编译中排除。
1
| EmptyProject\C2000Ware\common\source\F2837xD_SWPrioritizedPieVect.c
|
添加头文件和库文件引用
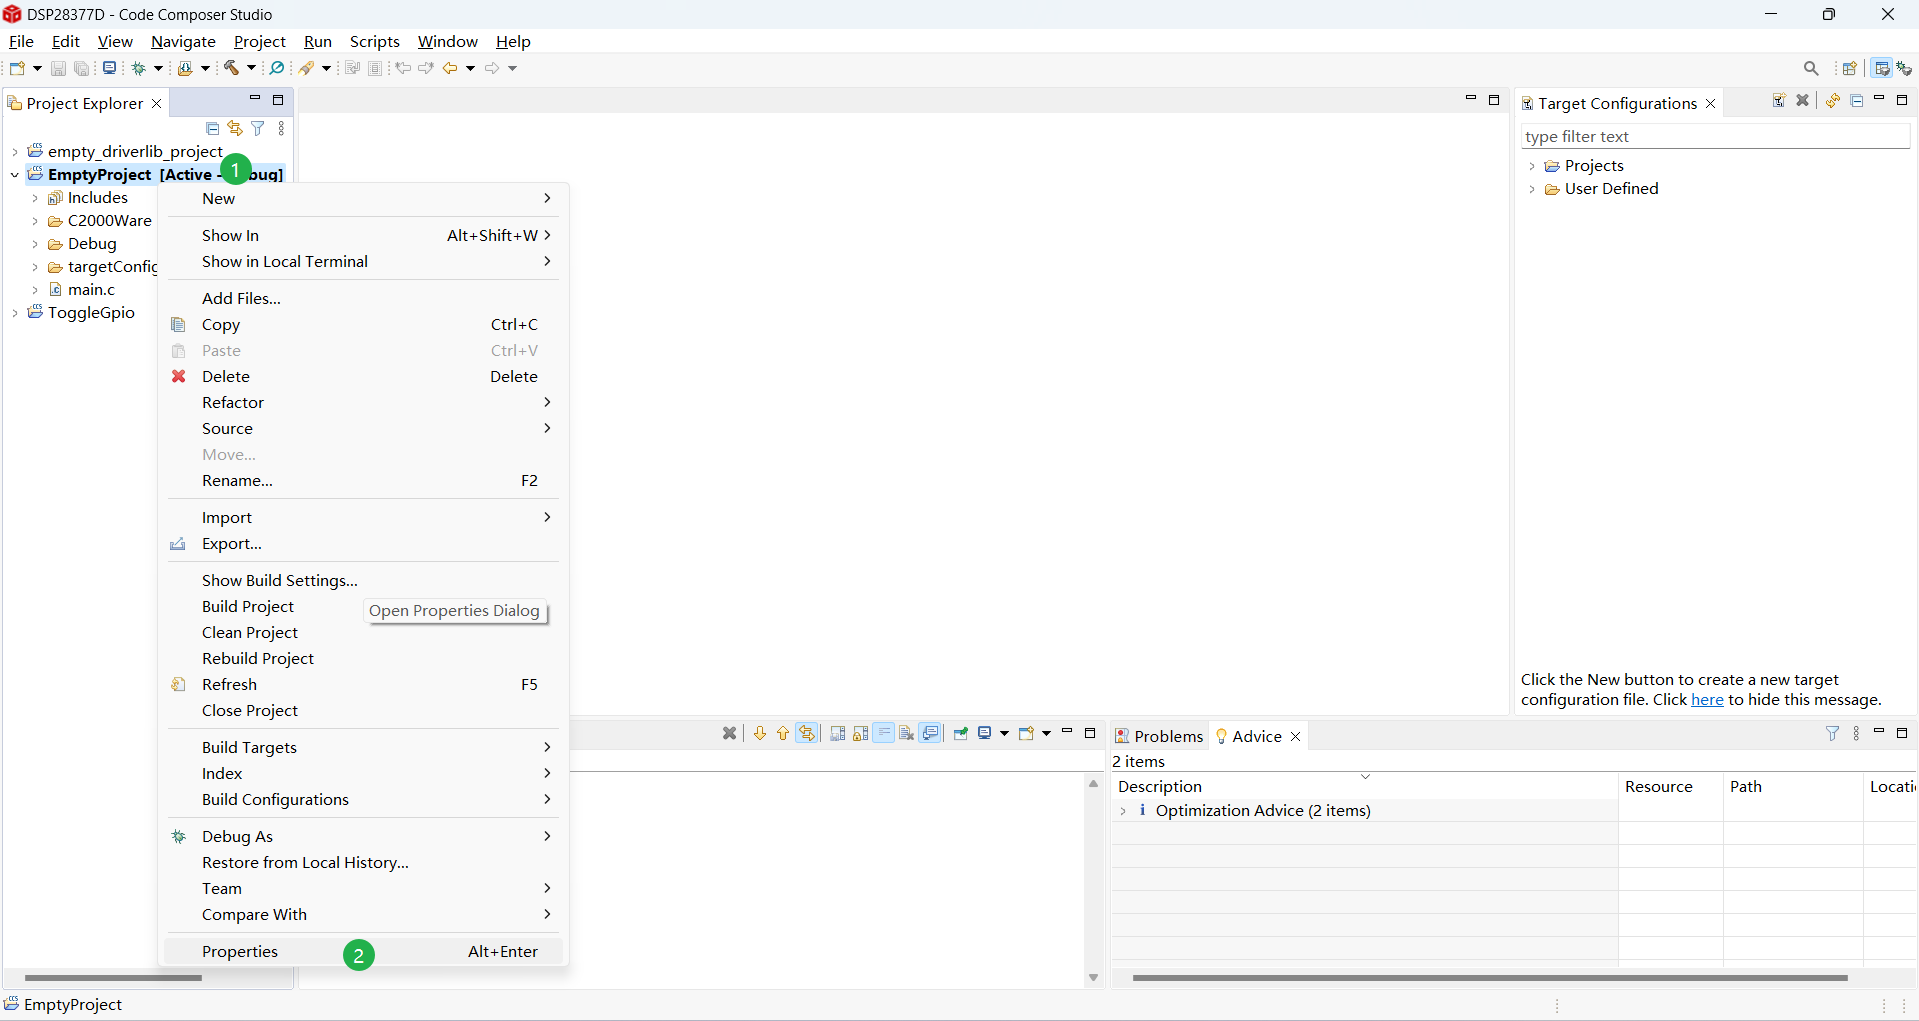
在 Project Explorer 中选中新建的项目,在项目名称上单击鼠标右键选择 Properties 选项打开项目属性对话框(Alt + Enter)。
添加头文件引用
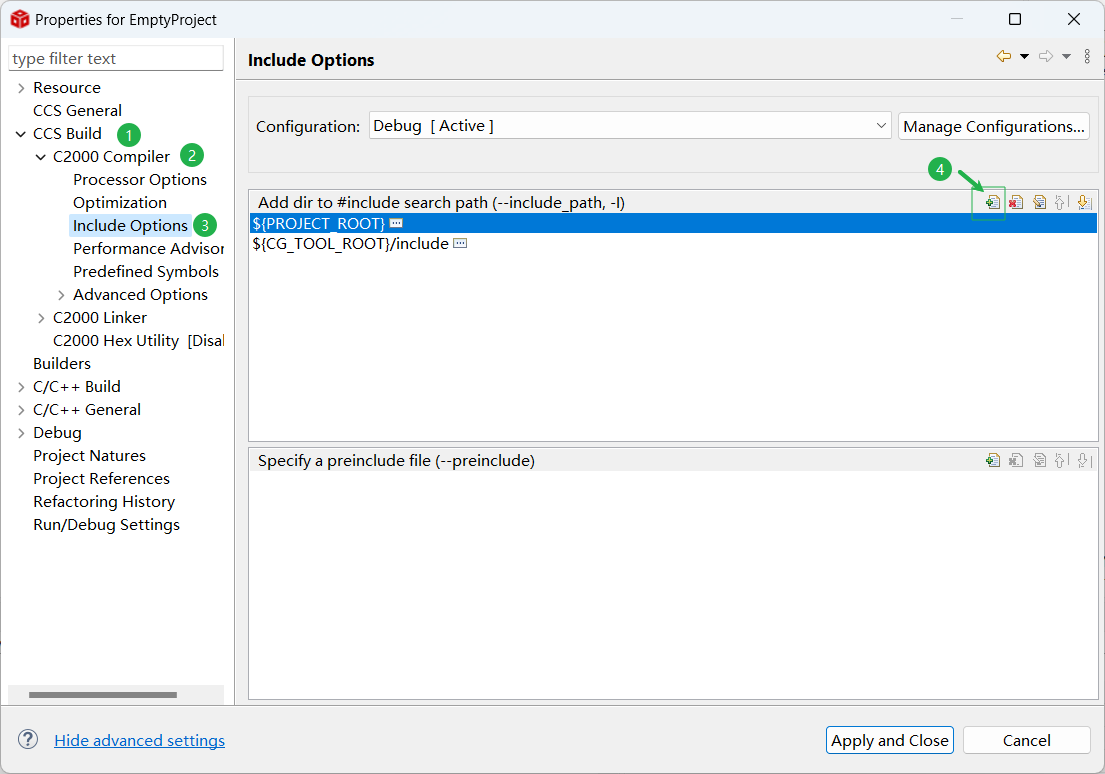
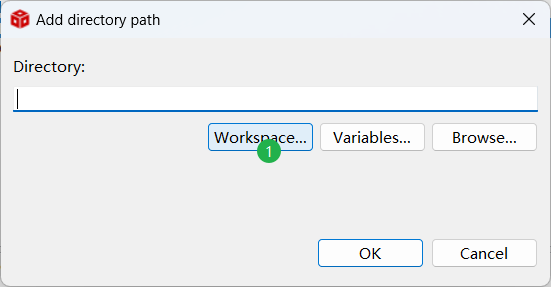
在打开的项目属性对话框中依次选择 CCS Build -> C2000 Compiler -> Include Options 选项,在 Add dir to #include search path (–include_path -I) 中点击添加头文件引用按钮。
在打开的 Add directory path 对话框中点击 Workspace... 按钮,依次选择 新建的项目 -> C2000Ware -> common -> include 文件夹,然后点击 Ok 按钮,将 common/include 文件夹添加到头文件搜索路径。
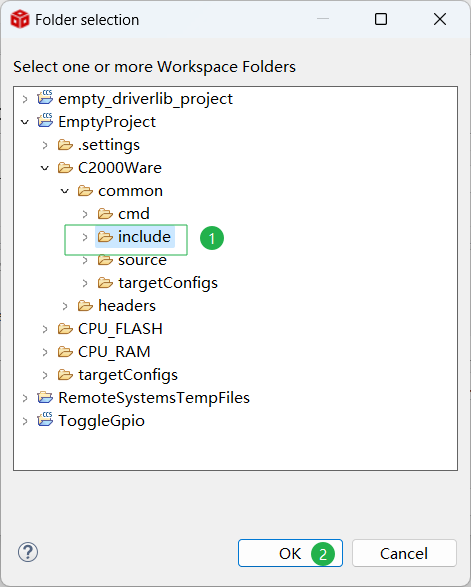
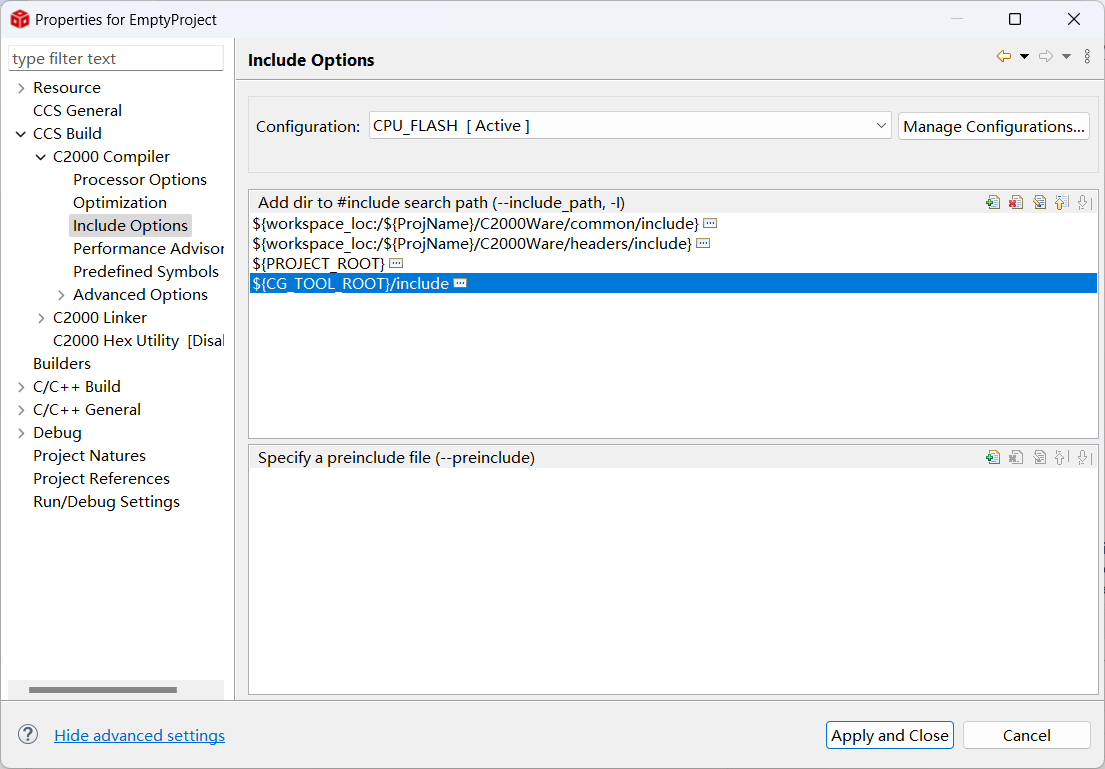
按照相同的方式,将 C2000Ware -> headers-> include 文件夹添加到头文件搜索路径中,添加头文件后的结果如下图所示。
添加库文件引用
TI 的 cl2000 编译器在进行链接时,会自动链接项目目录中的所有 lib 文件,因此不需要将库文件添加到库文件搜索路径(只有库文件不在项目目录中时才配置 File Search Path)。
在执行链接命令时,需要保证 .lib 位于最后一个位置(cl2000 会按照顺序链接 .out 文件,并在后续文件中搜索未定义符号,如果 lib 文件在前面编译将找不到部分函数的定义)。
1
| "E:/CodeComposerStudio/CCS12.7/ccs/tools/compiler/ti-cgt-c2000_22.6.1.LTS/bin/cl2000" -v28 -ml -mt --cla_support=cla1 --float_support=fpu32 --tmu_support=tmu0 --vcu_support=vcu2 --advice:performance=all --define=CPU1 -g --diag_warning=225 --diag_wrap=off --display_error_number --abi=eabi -z -m"EmptyProject.map" --stack_size=0x200 --warn_sections --disable_auto_rts --diag_wrap=off --display_error_number --xml_link_info="EmptyProject_linkInfo.xml" --rom_model -o "EmptyProject.out" "./main.obj" "./C2000Ware/common/source/F2837xD_Adc.obj" "./C2000Ware/common/source/F2837xD_CodeStartBranch.obj" "./C2000Ware/common/source/F2837xD_CpuTimers.obj" "./C2000Ware/common/source/F2837xD_DBGIER.obj" "./C2000Ware/common/source/F2837xD_DefaultISR.obj" "./C2000Ware/common/source/F2837xD_Dma.obj" "./C2000Ware/common/source/F2837xD_ECap.obj" "./C2000Ware/common/source/F2837xD_EPwm.obj" "./C2000Ware/common/source/F2837xD_EQep.obj" "./C2000Ware/common/source/F2837xD_Emif.obj" "./C2000Ware/common/source/F2837xD_Gpio.obj" "./C2000Ware/common/source/F2837xD_I2C.obj" "./C2000Ware/common/source/F2837xD_Ipc.obj" "./C2000Ware/common/source/F2837xD_Ipc_Driver.obj" "./C2000Ware/common/source/F2837xD_Ipc_Driver_Lite.obj" "./C2000Ware/common/source/F2837xD_Ipc_Driver_Util.obj" "./C2000Ware/common/source/F2837xD_Mcbsp.obj" "./C2000Ware/common/source/F2837xD_PieCtrl.obj" "./C2000Ware/common/source/F2837xD_PieVect.obj" "./C2000Ware/common/source/F2837xD_Sci.obj" "./C2000Ware/common/source/F2837xD_Spi.obj" "./C2000Ware/common/source/F2837xD_SysCtrl.obj" "./C2000Ware/common/source/F2837xD_TempSensorConv.obj" "./C2000Ware/common/source/F2837xD_Upp.obj" "./C2000Ware/common/source/F2837xD_can.obj" "./C2000Ware/common/source/F2837xD_sci_io.obj" "./C2000Ware/common/source/F2837xD_sdfm_drivers.obj" "./C2000Ware/common/source/F2837xD_struct.obj" "./C2000Ware/common/source/F2837xD_usDelay.obj" "./C2000Ware/headers/source/F2837xD_GlobalVariableDefs.obj" "../C2000Ware/common/cmd/2837xD_FLASH_lnk_cpu1.cmd" "../C2000Ware/headers/cmd/F2837xD_Headers_nonBIOS_cpu1.cmd" "../C2000Ware/libs/rts2800_fpu32_eabi.lib"
|
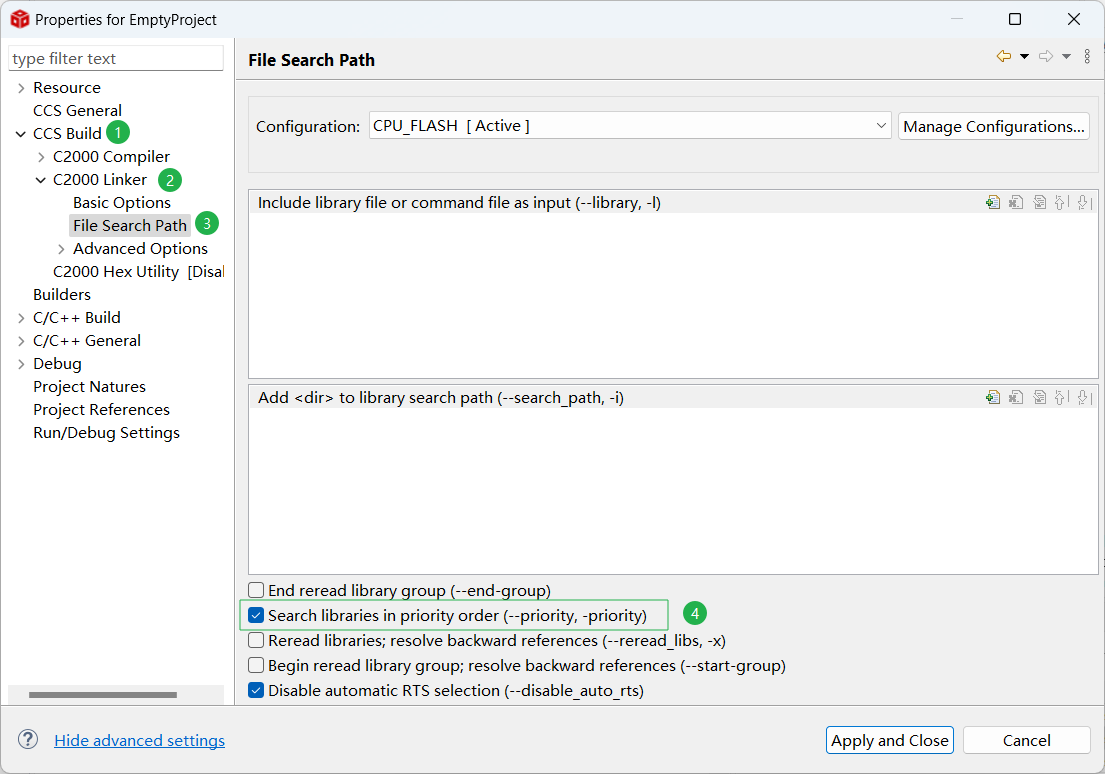
如果 .lib 文件不在最后编译,需要勾选链接器的 --priority 的选项。
设置烧录的 CPU
28377D 有两个 CPU,一个 CPU 对应一个独立的项目,因此需要为项目指定烧录到那个 CPU 中。如果不指定 CPU 直接进行项目编译将提示下面的错误。
1
| #35 #error directive: "You must define CPU1 or CPU2 in your project properties. Otherwise, the offsets in your header files will be inaccurate."
|
在禁用 CMD 文件时,只启用了[CPU1 的 CMD 文件](##禁用不使用的 CMD 文件)。所以添加预定义宏将本项目配置到 CPU1 中(烧录到 CPU2 时,也需要启用不同的 CMD 文件)。
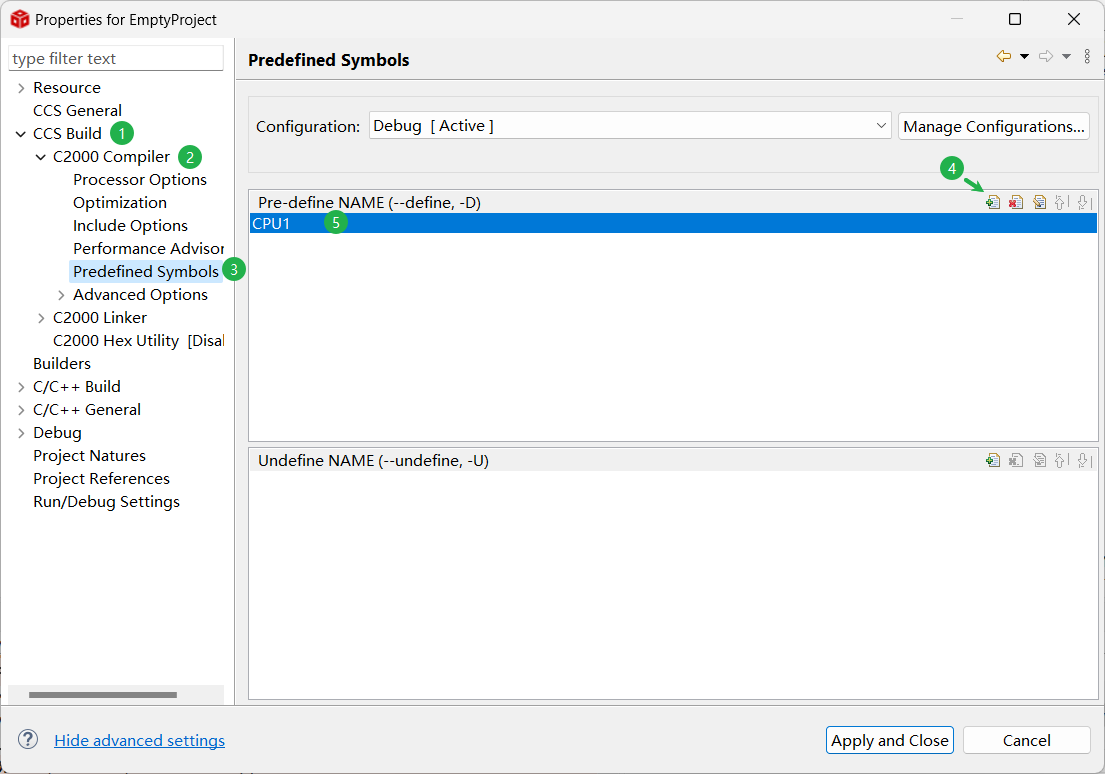
打开项目属性对话框,依次选择 CCS Build -> C2000 Compiler-> Predefined Symbols 选项,在 Pre-define NAME (--define, -D) 中点击添加预定义宏按钮,添加宏 CPU1,如果要烧录到 CPU2 则添加宏 CPU2。
添加 FLASH 和 RAM 烧录配置
cmp 文件用于配置代码和数据的存放位置、加载位置和运行位置。 为了实现一个项目可以同时烧录到 FLASH 和 RAM 中,需要建立两个配置文件,并在配置文件中设置对应的 cmd 文件。在新建项目时 CCS 会自动建立 Debug 和 Release 这两个配置文件,并激活 Debug 配置。上面已经在 Debug 配置中设置了头文件和库文件,为了简化流程,直接用 Debug 配置烧录到 RAM。
首先在 Project Explorer 确定当前激活的配置为 Debug ,然后取消勾选 2837xD_RAM_lnk_cpu1.cmd 文件的 Exclude from Build 选项 。
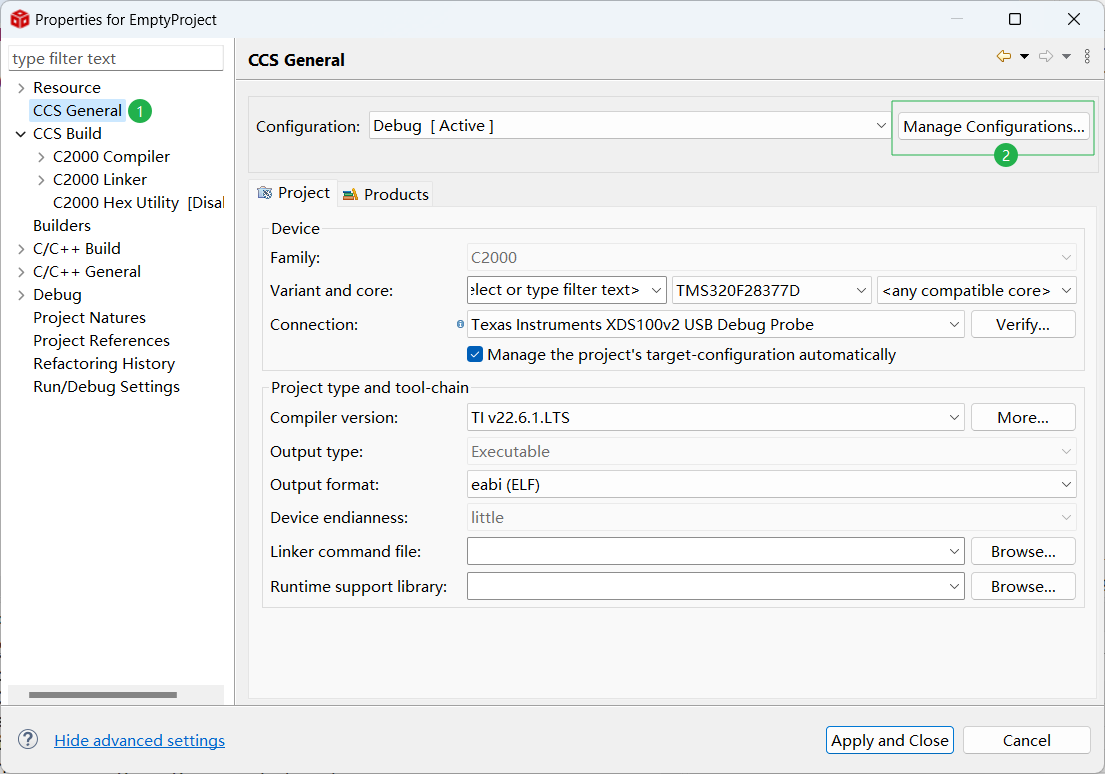
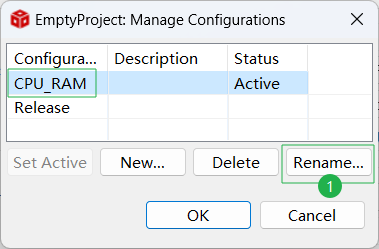
打开项目属性对话框,选择 CCS General 选项,点击 Manage Configurations... 按钮,将 Debug 配置重命名为 CPU_RAM 。
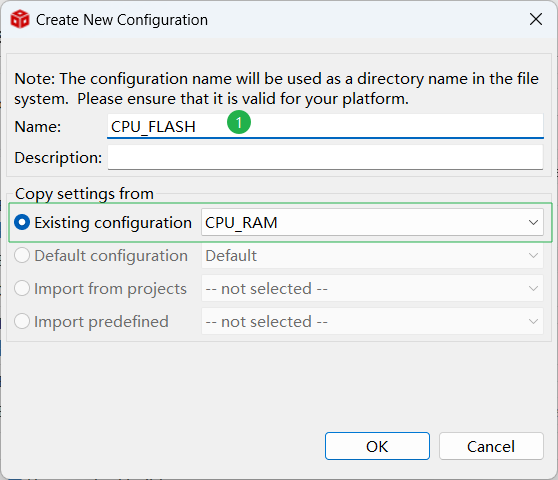
在项目配置对话框中选择 Release 配置,删除 Release 配置,点击 New ... 按钮新建 CPU_FLASH 配置,并点击 Set Active按钮激活 CPU_FLASH 配置。回到 Project Explorer 中确定当前激活的配置为 CPU_FLASH 。在 2837xDFLASH_Ink_cpu1.cmd 文件中点击鼠标右键取消选中 Exclude from Build ,在 2837xD_RAM_Ink_cpu1.cmd 文件中点击鼠标右键选中 Exclude from Build 。
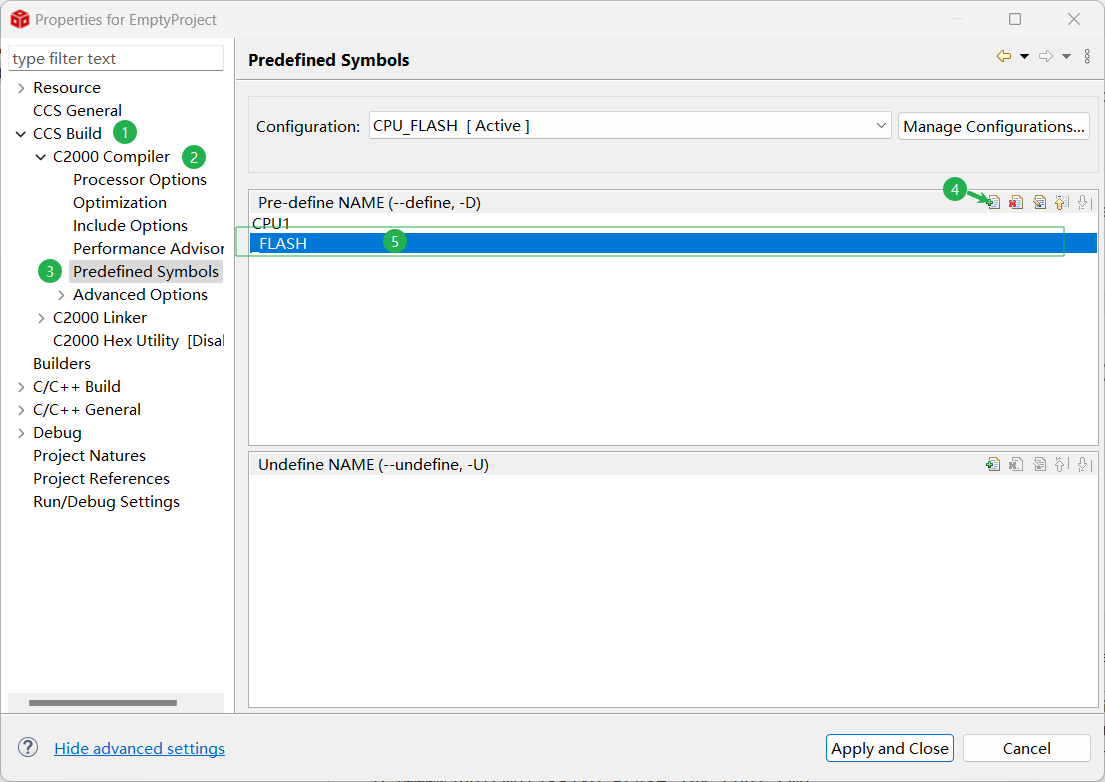
在预定义宏对话框中添加 _FLASH 宏,保证 FLASH 相关代码能够正确执行。预定义宏对话框的路径为 CCS Build -> C2000 Compiler-> Predefined Symbols 。添加后 _FLASH 宏后的结果如下图所示:
重要
将代码烧录到 FLASH 时,激活 CPU_FLASH 配置;将代码烧录到 RAM 时,激活 CPU_RAM 配置。然后编译项目进行烧录即可。
确定编译和链接选项
在进行项目烧录时,还需要打开项目属性对话框确定编译选项和链接选项,以保证程序正确编译。编译选项的路径为 CCS Build -> C2000 Compiler ,链接选项的路径为 CCS Build -> C2000 Linker 。
CPU_RAM 配置中的编译选项如下:
1
| -v28 -ml -mt --cla_support=cla1 --float_support=fpu32 --tmu_support=tmu0 --vcu_support=vcu2 -Ooff --include_path="D:/Codes/DSP28377D/EmptyProject/C2000Ware/common/include" --include_path="D:/Codes/DSP28377D/EmptyProject/C2000Ware/headers/include" --include_path="D:/Codes/DSP28377D/EmptyProject" --include_path="E:/CodeComposerStudio/CCS12.7/ccs/tools/compiler/ti-cgt-c2000_22.6.1.LTS/include" --define=CPU1 --diag_suppress=10063 --diag_warning=225 --diag_wrap=off --display_error_number --abi=eabi
|
CPU_RAM 配置中的链接选项如下:
1
| -v28 -ml -mt --cla_support=cla1 --float_support=fpu32 --tmu_support=tmu0 --vcu_support=vcu2 -Ooff --define=CPU1 --diag_suppress=10063 --diag_warning=225 --diag_wrap=off --display_error_number --abi=eabi -z -m"EmptyProject.map" --stack_size=0x200 --warn_sections -i"E:/CodeComposerStudio/CCS12.7/ccs/tools/compiler/ti-cgt-c2000_22.6.1.LTS/lib" -i"E:/CodeComposerStudio/CCS12.7/ccs/tools/compiler/ti-cgt-c2000_22.6.1.LTS/include" --priority --disable_auto_rts --diag_wrap=off --display_error_number --xml_link_info="EmptyProject_linkInfo.xml" --rom_model
|
CPU_FLASH 配置中的编译选项如下:
1
| -v28 -ml -mt --cla_support=cla1 --float_support=fpu32 --tmu_support=tmu0 --vcu_support=vcu2 --include_path="D:/Codes/DSP28377D/EmptyProject/C2000Ware/common/include" --include_path="D:/Codes/DSP28377D/EmptyProject/C2000Ware/headers/include" --include_path="D:/Codes/DSP28377D/EmptyProject" --include_path="E:/CodeComposerStudio/CCS12.7/ccs/tools/compiler/ti-cgt-c2000_22.6.1.LTS/include" --define=CPU1 -g --diag_warning=225 --diag_wrap=off --display_error_number --abi=eabi
|
CPU_FLASH 配置中的链接选项如下:
1
| -v28 -ml -mt --cla_support=cla1 --float_support=fpu32 --tmu_support=tmu0 --vcu_support=vcu2 -Ooff --define=CPU1 --diag_suppress=10063 --diag_warning=225 --diag_wrap=off --display_error_number --abi=eabi -z -m"EmptyProject.map" --stack_size=0x200 --warn_sections -i"E:/CodeComposerStudio/CCS12.7/ccs/tools/compiler/ti-cgt-c2000_22.6.1.LTS/lib" -i"E:/CodeComposerStudio/CCS12.7/ccs/tools/compiler/ti-cgt-c2000_22.6.1.LTS/include" --priority --disable_auto_rts --diag_wrap=off --display_error_number --xml_link_info="EmptyProject_linkInfo.xml" --rom_model
|
对于每个选项的详细信息可参考
TMS320C28x 优化 C/C++ 编译器v22.6.0.LTS (Rev. Z)
。
标准的 main 函数示例
参考官方的示例程序,设计出一个标准的 main 函数示例模板如下:
 1
 2
 3
 4
 5
 6
 7
 8
 9
10
11
12
13
14
15
16
17
18
19
20
21
22
23
24
25
26
27
28
29
30
31
32
33
34
35
36
37
38
39
40
41
42
43
44
45
46
47
48
49
50
51
52
53
54
55
56
57
58
59
60
61
62
63
64
65
66
67
68
69
70
71
72
73
74
75
76
77
78
79
80
81
82
83
84
85
86
87
88
89
90
91
92
93
| //
// Included Files
//
#include "F28x_Project.h"
void main()
{
//
// Step 1. Initialize System Control:
// PLL, WatchDog, enable Peripheral Clocks
// This example function is found in the F2837xD_SysCtrl.c file.
//
InitSysCtrl();
//
// Step 2. Initialize GPIO:
// This example function is found in the F2837xD_Gpio.c file and
// illustrates how to set the GPIO to it's default state.
//
InitGpio();
//
// Step 3. Clear all interrupts and initialize PIE vector table:
// Disable CPU interrupts
//
DINT;
//
// Initialize the PIE control registers to their default state.
// The default state is all PIE interrupts disabled and flags
// are cleared.
// This function is found in the DSP2833x_PieCtrl.c file.
//
InitPieCtrl();
//
// Disable CPU interrupts and clear all CPU interrupt flags:
//
IER = 0x0000;
IFR = 0x0000;
//
// Initialize the PIE vector table with pointers to the shell Interrupt
// Service Routines (ISR).
// This will populate the entire table, even if the interrupt
// is not used in this example. This is useful for debug purposes.
// The shell ISR routines are found in DSP2833x_DefaultIsr.c.
// This function is found in DSP2833x_PieVect.c.
//
InitPieVectTable();
//
// Interrupts that are used in this example are re-mapped to
// ISR functions found within this file.
//
EALLOW; // This is needed to write to EALLOW protected registers
PieVectTable.EPWM1_INT = &epwm1_timer_isr;
EDIS; // This is needed to disable write to EALLOW protected registers
//
// Step 4. Initialize all the Device Peripherals:
// This function is found in DSP2833x_InitPeripherals.c
//
InitPeripherals();
//
// Step 5. enable interrupts
//
//
// Enable CPU INT3 which is connected to EPWM1-3 INT
//
IER |= M_INT3;
//
// Enable EPWM INTn in the PIE: Group 3 interrupt 1
//
PieCtrlRegs.PIEIER3.bit.INTx1 = PWM1_INT_ENABLE;
//
// Enable global Interrupts and higher priority real-time debug events
//
EINT; // Enable Global interrupt INTM
ERTM; // Enable Global realtime interrupt DBGM4
//
// Step 6. User specific code
//
}
//
// End of File
//
|